
Never Miss a Beat: Get a snapshot of the issues affecting the IT industry straight to your inbox.
Disasters happen to the best of computers. Luckily, open source apps like SystemRescueCD, dd, Partedmagic, BackTrack, Security Tools Distribution, Helix, and TestDisk can help recover important data and bring dead systems back to life.
15 Min Read

At some point, it hits all of us. One day you're chugging merrily along, and then you're staring at a machine that won't boot -- a machine that just happens to contain everything of importance to you. While some degree of disaster is inevitable, it's how you cope with it that counts.
While computers and file systems get more robust with each passing year, there's always going to be room for disaster recovery techniques. With open source solutions to help you recover from such messes, you're not tied to a proprietary product's costs or licensing agreements, and if you're so inclined you can rework the source code to meet your own needs.
I'm going to explore various ways you can use open source solutions to recover data, bring dead systems back to life, and save your bacon in general. Many of the solutions described here run cross-platform (Lin/Win/Mac), but some of them are *NIX-only and will be described as such.
Disaster Scenarios
No two data disasters unfold in quite the same way. To that end, you'll want to take the appropriate recovery action depending on what went wrong.
Simple recovery. This is the sort of recovery that you employ for files that have been freshly deleted -- typically by mistake, since accidental data deletion is the single biggest reason why files go missing. Most of the time your local "undelete" function or recycle bin / trash repository will keep you from doing anything really stupid, but sometimes that's of no use: for instance, if you forced a hard delete, or if you deleted a file from a volume that has no recovery functions enabled. Generally, you can scan the volume in question offline with a tool designed to look for and recover specific types of files (see PhotoRec later in this article), and pick up the pieces that way.

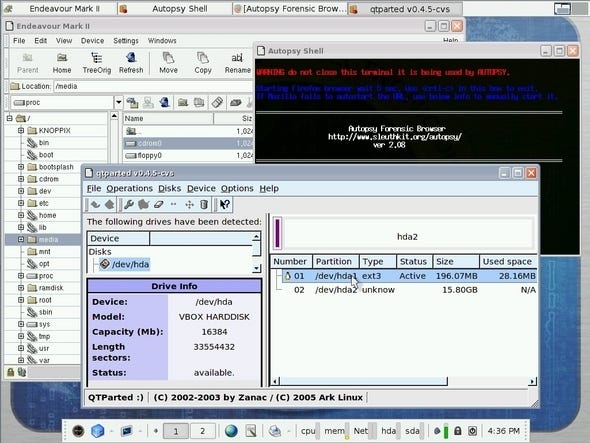
The BackTrack live CD distribution is packed with recovery tools, including the powerful Autopsy toolset.Complex recovery. This encompasses things like whole partitions or boot loaders going missing, along with everything on that partition. There are two basic approaches you can use here: recover what data you can from the partition, without trying to reconstruct the partition information per se; or attempt to reconstruct the partition's metadata and remount the partition normally.
The first option is easier, although if you're dealing with an operating system partition, odds are the files you recover from there probably can't be cobbled back together into a bootable system. The second option will give you a more complete recovery, but that'll depend on how much of the actual volume data is intact. Fortunately, there are ways to recover files even from partly formatted volumes, as I'll discuss later on.
Removable storage or optical media. I've had more than my fair share of CDs or DVDs end up unreadable due to damage or age, but I've been lucky enough recover what I needed from them. Most tools work fine on removable drives or optical media, although in the case of CDs and DVDs, one important thing to keep in mind is the drive you're using to read them. If you have access to more than one CD/DVD drive, try creating images using different drives. You may find that one has better error correction or jitter tolerance than the others, and can recover data that other drives might skip over entirely. Also, performing the recovery from within Linux rather than Windows may yield different results as well.
Encrypted media recovery. This is where you say your prayers. If you're trying to recover something -- like, say, the encryption key -- from an encrypted volume, unless you used a laughably weak encryption algorithm in the first place (and why were you doing that?), you're about as likely to get that data back as a falling apple is likely to evade the law of gravity. Encrypted volumes should be treated with double the care of standard volumes: back up the volume headers (encrypted file systems typically have a provision for doing this) and keep them in a safe place, also encrypted.
In all cases, whenever you start performing recovery, make sure that any media you mount to recover from is mounted as read-only. This minimizes the chances of the distro or OS mounting and performing read/write operations on a drive that's "fragile" (i.e., holding data that needs to be recovered). Also do as little work with the original media as possible: make an image file from the media, store it on another drive you know is good, and then work from the image. Linux Distros Specifically For Data Recovery
A recovery-specific Linux distribution is the simplest place to start if you have a big recovery job ahead of you. You get a great many tools in one place, along with at least some degree of organization for them.
Many "tiny" distributions like Puppy Linux or DSL (two of my personal favorites) work nicely for this sort of thing, and are fine for just mounting a volume and copying files out by hand without doing anything special. That said, the technically savvy may be better off with a distro that has as many recovery-specific tools as possible built in.
The Gentoo-based SystemRescueCD distribution, for instance, packs a broad gamut of tools into a single 200-MB .ISO file. Boot it from a CD or USB drive and you can perform recovery functions either from a command line or an optional X desktop. SRCD does require some foreknowledge of Linux, though; if you're not comfortable doing things like manually mounting volumes from the command line, you might find yourself somewhat at sea. That said, it's possible to accomplish just about anything if you don't mind a bit of a learning curve.
Another recovery distribution that's a touch more user-friendly is Partedmagic. It features many of the same tools, but boots directly into an X desktop and provides graphical user interface access to some of the most common and powerful programs. Again, at least some knowledge of Linux is helpful, even if it's only basic techniques such as mounting or unmounting file systems, but less sophisticated users can probably start here.
| |
| |
Both distributions also give you the freedom to run the whole gamut of Linux applications out there, connect to the Internet if needed, and do most anything else that you might care to do. (They don't come with as broad a range of programs as most desktop distros, but, if you're so inclined, it's not hard to add applications of your choice or perform other customizations on the disk image.)
Experts who aren't daunted by the command line and want to get the full range of tools available can go for one of various live CD distributions compiled for performing forensic investigations of various kinds (with data recovery being one of several possible functions).
I liked BackTrack and the Knoppix-based STD (Security Tools Distribution), which also crams in a good many general security-oriented tools on top of a roster of forensic / data-recovery apps.
Another Knoppix re-spin for forensic / recovery work is Helix, which by default runs in what could be called "paranoid mode": it will not mount any file systems unless specifically commanded to do so. Since each one of these is a live CD, give each one a try and see which one you're most comfortable with out of the box. Dd And Its Variants
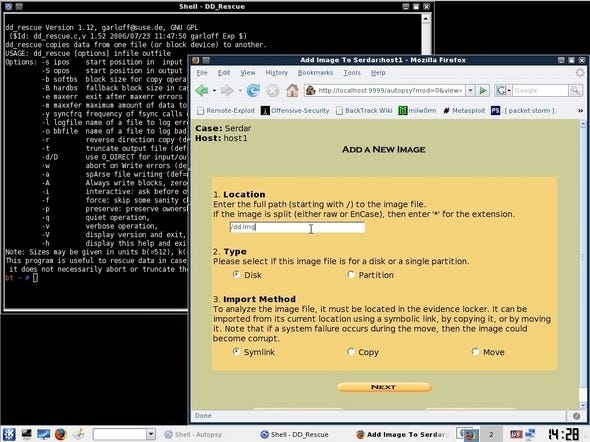
One common command-line data recovery tool from the Linux (or, rather, *NIX) world is dd, which can be used to generate an image file from any mounted file system or device. This is useful if you are dealing with a file system or device that's damaged in some way and you want to perform your recovery operations on a backup copy of the data rather than the device itself.
The best way to describe how dd works is to give an example of it in action. The Paulski Pages Web site shows it being used to perform data recovery from a physically failing drive. Debian Admin offers another walkthrough, written for Debian-based Linux distributions, but the basic concepts can be used more or less universally. The user copies the file system to an image file, mounts the image as a file system, and then performs recovery operations from the image.
The "stock" version of dd comes with just about any Linux distro, but you may want instead to use a variant named dd_rescue, which sports some slightly different behaviors. You can also use dd_rhelp on top of it, which is a utility that makes using dd_rescue all the easier. (Yet another program called ddrescue [note the lack of the underscore] also exists, with again a slightly different set of options.)
Note that when you attempt to make an image using one of these programs, always ensure the target for the image has at least as much free space as the original device. Also, dd can be used to destroy data on any mounted file system or device, so get familiar with the proper use of the program before you try to use it for anything!
Beyond Dd
| |
| |
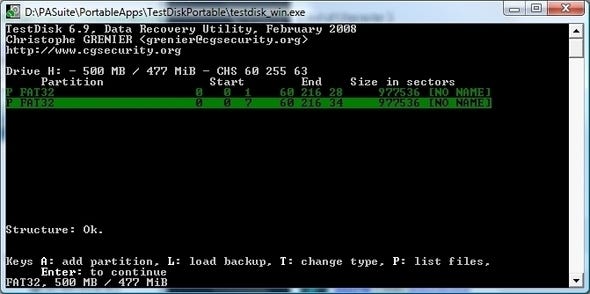
If using dd seems entirely too difficult, you may want to go instead with something a little more interactive. Consider TestDisk, which can perform dd-like actions and is also designed for many other whole-disk recovery operations -- for instance, repairing a partition lost due to a damaged partition table or manual deletion.
TestDisk is menu-driven and comes with detailed step-by-step instructions for running it on a variety of platforms and file systems, although you'll need to have some understanding of disk structures (partitions, allocation tables, etc.) before you dive in and begin swimming. You might want to have a guru riding shotgun with you.
Dd images can be mounted directly as file systems within Linux by using the mount command. However, if the image contains a file system that you want to boot directly, there are ways to boot that image within a virtual machine. This is useful if you're worried about, for instance, a virus on the imaged drive, or want to perform some other kind of work that requires a live environment but don't have a machine to spare.
The Java-based Live View tool lets you turn any dd image into a VMware virtual machine, and also caches any changes made to the image so that the original image is not touched. Note that you need to have one of the VMware products (like VMware Player) installed for Live View to work. File Carving
I mentioned before that it is possible to recover files from file systems where the partition information has been damaged or where the volume itself has been partially reformatted. This can be done through a technique called "data carving" or "file carving," where a program hunts for specific kinds of files by looking for patterns common to certain file types. One of the best things about this technique is that it's almost entirely automatic: all you have to do is point it at a partition -- or the place where a partition was -- select a place to restore the files to, and let the program do the heavy lifting.
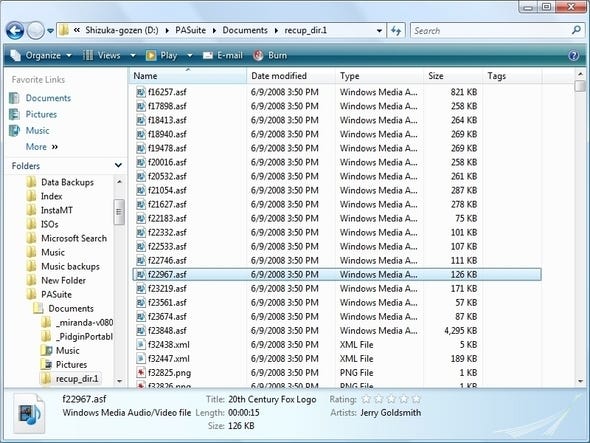
The authors of TestDisk have created an excellent file-carving tool called PhotoRec, which recovers many common file formats from pretty much any type of media.
This is about as essential a standalone file-recovery tool as you're going to get. I tried it out on a camera card I'd written off as wiped out after a recent trip, and managed to recover literally everything from the card -- both pictures and video. It wasn't able to recover some of the actual filenames, but the files themselves were all perfectly readable. Like TestDisk, by default it will attempt to copy files somewhere other than the media being rescued to avoid further damage.
The default settings for PhotoRec generally work fine, but if you need finer-grained control there are a few options you can set. "Paranoid mode," normally disabled, recovers everything including partially corrupted files; if you turn this on, you'll get more data recovered, but the recovery process may take much longer. (Brew some coffee.) In the same vein, "Keep corrupted files" will recover files that are not fully readable in the hopes that the user can salvage something further from them, perhaps with a hex editor or another tool.
| |
| |
Note that most of the time, files recovered with PhotoRec will not have their original names, but internal metadata (e.g., MP3 tags or EXIF data) will still be available. Also note that if you're looking for one very specific kind of file in a relatively small file system, you can use the program's internal options to narrow down the search and not waste time recovering everything under the sun.
TestDisk and PhotoRec are also both included by default with the Partedmagic rescue disc, so that's one of the easiest ways to get your hands on them and put them to work -- but you can also download them as standalone programs and use them that way. Both can also be integrated into the BartPE rescue disc if you use it; my trick has been to include them with my PortableApps installation. It's also possible to mount them on a removable drive, boot a Vista installation DVD (if you have one), go to the System Recovery command line, and then run the programs from there. Advanced Data-Carving Applications
TestDisk and PhotoRec are only the tip of the iceberg, but more advanced programs are typically intended for full-blown forensics work and not casual use.
The granddaddy of all data-carving programs is probably Foremost, originally developed for the United States Air Force's Office of Special Investigations. It's now been released into the public domain, so it can be used pretty much anywhere and even re-used in other programs. Note that binaries are not readily available for Foremost; you generally need to compile the program from source to make it workable. Some Linux distributions (like Ubuntu Feisty) have a precompiled version of Foremost available in the software repository, which makes it easy to download and use.
In the same vein is Scalpel, a rewrite of the 0.69 version of Foremost -- it's faster, makes better use of memory, and has a number of other handy functions for more advanced file retrieval. It also is not readily available in a binary edition, and must be compiled from source.
| |
| |
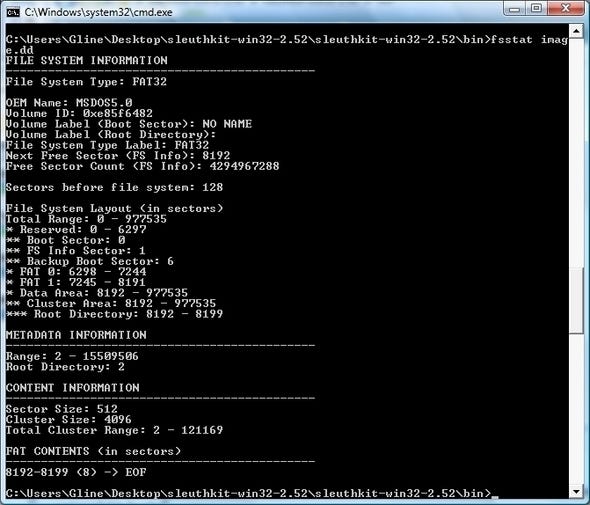
One extremely powerful collection of tools that can be run on a variety of platforms (*NIX, BSD, and Windows using the CYGWIN library) is the Sleuth Kit. Like Foremost and Scalpel, it can search for deleted files based on hashes or signatures, but it also sports a tremendous range of other functions. TSK nominally comes as a set of command-line tools, which you can use if you're comfortable with that, but you can also download a graphical interface called Autopsy that provides you with a powerful front-end for the tools in the kit .
One batch of data-carving and -recovery tools that is not open source but not commercial either, and worth mentioning as a postscript, is the PartitionSupport.com utilities, which run on 32-bit Windows and provide a host of functions for recovering data from damaged file systems of all kinds.
Among the apps available -- just to give you an idea of what they can do -- is FindJPG and FindDoc, which comb through a disk, cylinder by cylinder, and reconstruct all .JPG or .DOC files to the current directory, much like PhotoRec. Again, source code is not available for these tools, but they're easy to work with and freely available for individual use, which makes them fine as a personal or in-house recovery toolkit.
About the Author(s)

Follow Serdar Yegulalp and BYTE on Twitter and Google+:
 Twitter @syegulalp @BYTE
 Google+ Serdar Yegulalp on Google+
You May Also Like
More Insights
Webinars
Editor's Choice


May 2, 2024
While there are plentiful options in cyber resiliency and business continuity tools and platforms, there isn’t one that can knock out everything from sudden cloud outages to prolonged ransomware attacks in a single punch. What can you do to keep the company on its feet no matter what is thrown at it? Find out in this new virtual event.
Reserve Your Seat Now