
Never Miss a Beat: Get a snapshot of the issues affecting the IT industry straight to your inbox.
Create custom Windows Vista installations by adding or removing system components and automating setup options with vLite. It's unsupported by Microsoft, but vLite is free and will delight Vista enthusiasts.
15 Min Read

One could write an absorbing history of personal computers and software as a tinkerer's paradise. There's an undeniable thrill in hacking something to behave in ways never foreseen by its manufacturer. This includes Windows itself, of course, courtesy of countless third-party tools and techniques. In the Windows XP days, one such tool was (and is) nLite. Now, from the same author, Dino Nuhagic, there's vLite.
| |
| |
vLite, or "Vista Lite," lets you take an existing Windows Vista installation DVD and customize it to add the things you do want -- and remove the things you don't want. The resulting disk image can be saved to a file or burned out to DVD and used to create new Vista installations, whether 32- or 64-bit. In this article I'll look at vLite up close, analyze how it works, and see how it fares from beginning to end.
Some caveats are in order. First, vLite doesn't customize an existing Windows installation, just the DVD image -- you can't use vLite to change the way your current desktop behaves. vLite is also, predictably enough, not in the least supported or sanctioned by Microsoft. If you use it to build a Windows Vista install disc and then install a copy of Vista from that, you're pretty much on your own. Finally, I should point out that the license terms expressly forbid vLite being used in anything other than a personal context without the author's permission -- and that once again, anything that happens as a result of using vLite is entirely your responsibility.
Getting Started
To use vLite, you'll need three things: the application itself (which is freely downloadable), a running copy of Windows (XP or Vista), and the Vista installation media. I've noticed that newer PCs that ship with Vista are, thankfully, reverting to the good old habit of providing an actual Vista installation disc instead of merely a restore partition, so I used that as my source for Vista's files.
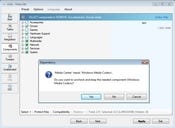
When you install vLite, the program checks for the existence of two additional things which are needed for vLite to work: the file system filter manager (which is usually part of Vista), and the WIM filter driver, which allows a Windows Image file -- a disk image -- to be mounted as a drive. Vista's install media contains a WIM image that's unpacked onto the target computer during the initial installation process.
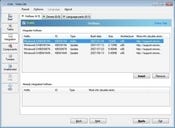
The first step in using vLite proper is to provide the installation media and point the program to a folder where the install files can be copied and expanded. Make sure you have a generous amount of free space -- 5 to 10 GB -- to copy the installation files and perform work on them. You'll also be prompted during this step to choose the appropriate iteration of Vista to configure, from Starter to Ultimate, so be sure to choose the correct one you have a license key for.
The next steps involve choosing what changes you want to make on the installation image. Any combination of these changes can be applied; there's nothing that says you have to apply all of them. Each of these changes is called out in its own tab in the program. Integration
| |
| |
The Integration tab lets you add hotfixes, device drivers, and language packs to the Vista system image. Since hotfixes cannot be readily added or "slipstreamed" into a Vista disk image -- at least, not yet -- this is one way to get around that limitation.
When you install Vista from the image you've created, everything you've selected will be preinstalled and ready to use. This is useful if you want to create an image that, for instance, already contains network or mass-storage controller drivers that aren't bundled with Vista, or that contains a hotfix for a hardware issue that might affect system setup.
To add a hotfix, click Insert and point the program to a .CAB or .MSU file that contains the hotfix. Device drivers require an individual .INF file, but you can also point to a folder that has multiple drivers listed in it if you want to integrate a whole sheaf of them at once. If you integrate multiple drivers, be sure only to integrate drivers that are Vista-compatible or you may end up with a mess on your hands.
Components
In this tab you can select components of Vista that will be permanently removed from the system image. This can be done as a way to save space, as a way to reduce the attack surface of the OS, or simply because you don't want something present. Over 170 different components can be removed or included in the following categories: Accessories, Drives, Games, Hardware Support, Languages, Multimedia, Network, Services, and System. One important thing to note is that the interface here is a little counterintuitive. If you check off a component in the list, you're removing it from the build image, not including it.
Also, remember that anything removed in this menu will be removed completely -- you won't be able to add it back in later unless you completely rebuild the DVD image. Part of why removing components wholesale from Vista is controversial is because it can break both backwards and forwards compatibility. For instance, a vLite-modified version of Vista cannot accept Vista SP1, unless you use one of the unorthodox slipstreaming methods that are out there. The safest way to proceed is to wait for a preintegrated Vista installation disc that has SP1 and then use vLite to process that system image (provided that vLite can still work with SP1).
The most crucial system components that have dependencies that might not be obvious are highlighted in red, but you can elect to protect specific files from being removed by clicking "Protect files" and specifying a path to the executable you want to leave in. When you do this, you'll get confirmation dialogs before going to the next step, where you can affirm or deny that anything that depends on the protected components will be retained. A similar mechanism, the "Compatibility" button, allows you to designate major, commonly used system components (like Internet Explorer) that are to be retained.
vLite's design lends itself to two basic approaches in this section. The first is to strip out everything and then click on "Compatibility" to add back in the features you need to support certain system functions, and then add more options (such as hardware support or drivers) on top of that if needed. This is the expert approach, and you may find that stripping out certain things will cause others to break in an unforeseen manner further on down the line. The other way is to include everything first, strip out only things that in your estimation don't absolutely have to be there, and ask that vLite protect the most crucial components. This is probably the easiest way to go if you're a relative novice and don't want to go through a lot of trial-and-error experimentation. Tweaks
| |
| |
This tab lets you change default system or application behaviors in four categories: Security, System, Explorer, and Internet Explorer. Most of these are options which can be changed manually in Vista after installation is complete, but if there's an option you'd rather have set by default, this is one easy way to address that. Note that these options are hard-wired into vLite; there's currently no way to add tweaks to vLite on your own.
Security: Antispyware realtime protection, DEP, and the infamous user account control can all be toggled from this section. People who don't want to wrestle with UAC out of the box may want to disable it while bringing their application mix up to speed, and then re-enable it manually later. Note that you cannot change settings for UAC or realtime protection if those features are being removed wholesale.
System: This controls common system options like power management (i.e., the behavior of the power button), AutoPlay, hibernation, and so on. The "Memory requirement" option controls how much memory Vista checks for at startup; it can be dialed down to 256 MB from its default of 512 MB. Keep in mind that running Vista in 256 MB mode is a dicey proposition at best. (My own belief is that the 512 MB or greater memory check is because Microsoft now figures in the average application load on top of the OS requirements.)
Explorer / Internet Explorer: These two sections control the behaviors for both Explorer and IE, including commonly toggled things like showing hidden/protected system files and whether or not the IE phishing filter is enabled by default. Experts who change these settings on any fresh installation will probably want to explore (pun unintended) both of these sections and tweak as desired.
Unattended Setup
This section lets you automate some of the common options that are provided during the setup process. The biggest attraction here is the ability to control how Vista asks for and uses a product key. You can elect to omit the prompt for a product key entirely, in which case vLite will automatically provide Microsoft's own trial product key. This only works for 30 days, after which you'll need to provide a real key and activate Vista properly. Note that SP1 changes how product activation works, so I imagine there will be some modification to this section after SP1 is officially released and prepatched versions of Vista are legion.
The behavior of the Welcome Center can also be modified -- you can change the default network location, the default "Protect Your PC" behavior, and (although this is risky) skip the user creation process, specify an admin password, and just log on automatically as the administrator.
The settings in the Regional tab let you set what time zone, currency, input method, and UI language to use. If you click Specify, this tab will automatically detect the settings on the current system and use those -- a handy timesaver.
Log
The Log tab is normally inactive; you're switched to it automatically when you click Apply to recompile the disk image as per your instructions. It provides real-time feedback for each step and lets you know what stage of the process it's on at any given moment.
ISO
This tab is used to set the options for creating a disk image, and to create the disk image itself. If you have a particular application you use to burn images and that you're most comfortable with, you'll probably want to just create an ISO and use that in your target application. Most of the time, the default options should do the job.
Presets And Options
If you want to preserve one or more states for the settings you've chosen, you can click Preset at the top of the program window and save the whole gamut of settings under a given name, or recall previously saved settings. The program normally retains the last batch of settings used, so you can pick up where you left off fairly easily if you work in multiple sessions. Options lets you choose where to write temporary files, and lets you change a few other program behaviors (like whether or not the last batch of settings are loaded when you start the program).
Compiling The Image
| |
| |
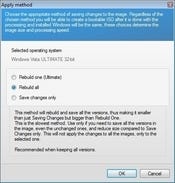
When you're finished with setting all the options in the various tabs, click Apply to actually start the process of compiling the system image. When you do this, you'll be presented with three options:
Rebuild One: This rebuilds and saves only the edition of Vista that you selected when you first copied the Vista source files. This creates the smallest possible disk image and is the default option -- useful if you know you're not going to be using any of the other editions of Vista from the recompiled media.
Rebuild All: This rebuilds every single edition of Vista, not just the one you modified, and so it'll create an image that is only slightly smaller than the default. Use this if there's a reason you need to have the other versions present on the image you're creating.
Save Changes Only: Writes only the changes you've made back to the image file in such a way that the resulting image will be written out extremely quickly. The resulting image will be larger than the one you started with, however, so this isn't recommended if you're trying to save space -- it's essentially a quick-and-dirty save option.
vLite will show the progress of the rebuild as it works. You might encounter errors during this stage, but they may just be spurious. (During one of my build exercises I ran into a "File not found" error, but it didn't seem to affect the outcome.)
Boot It Up
Once you're done building a disk image and burning it out to DVD or CD, boot it and try installing Vista with it. The first and more striking change you'll notice is the amount of space you can save both on a disk image and in an installation. On a test system with 20 GB of storage, I went from 13.2-GB free with a default installation of Vista, to 17.2-GB free when I selected "Remove all." The full disk image was 2.8 GB; I slimmed that down to a mere 488 MB (small enough to fit on a single CD) when I got rid of everything.
I should point out that on a newer hard drive (i.e., 160 GB or larger), the total difference that vLite will make in terms of disk usage is minimal. Hard drive space is cheap and will only get cheaper as time goes on. That said, there are other reasons why people might want to employ vLite other than disk usage, so it's not the only thing.
Does removing components create compatibility problems? From my end, it's hard to say without performing extended and rigorous testing, but I was able to install Office 2007 on my "nothing added" installation and run it without any noticeable issues. I'd suspect the consequences of removing components don't show up until much later on down the line, but some problems manifested immediately. Removing Internet Explorer, for instance, meant no Web browser of any kind out of the box unless I manually installed one further down the line.
The Bottom Line
Since vLite has no price tag attached to it (other than the time you invest in tinkering with it, and whatever dollar amount you may wish to donate via PayPal), it's a relatively easy way to experiment with unorthodox Vista configurations. Hardware and software hackers keen on making Vista jump through unusual hoops, like running with minimal memory, will have a blast with it. That said, the noncommercial licensing for the program -- and the fact that if you mess up something, you're more or less on your own -- means it's a forbidden fruit for corporate or enterprise IT folks, as far as official deployments go.
Note: vLite has been updated to support "slipstreaming" of SP1. See here for details.
About the Author(s)

Follow Serdar Yegulalp and BYTE on Twitter and Google+:
 Twitter @syegulalp @BYTE
 Google+ Serdar Yegulalp on Google+
You May Also Like
More Insights
Editor's Choice


May 2, 2024
While there are plentiful options in cyber resiliency and business continuity tools and platforms, there isn’t one that can knock out everything from sudden cloud outages to prolonged ransomware attacks in a single punch. What can you do to keep the company on its feet no matter what is thrown at it? Find out in this new virtual event.
Reserve Your Seat Now