


Never Miss a Beat: Get a snapshot of the issues affecting the IT industry straight to your inbox.
Build The Ultimate Quad-Core Desktop With Intel's QX9770
Our latest PC build project paired Intel's top-of-the-line Core 2 Extreme processor with an Asus motherboard, fast GeForce 8800 graphics, and DDR3 memory in a dual-boot configuration with both Vista and Windows XP.
15 Min Read

Intel has quietly begun shipping its hottest quad core desktop processor ever, the Core 2 Extreme QX9770. We built a PC, to see just how fast the 3.2-GHz, 45-nm chip, complete with a 1600-MHz front-side bus, really is.
|
|
| |
|
Our previous project, where we put together a system last fall with Intel's then top-of-the-line QX9650, resulted in a solid machine stymied by a poor choice in graphics cards.
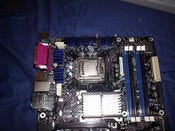
This time, we went with a high-end Gigabyte GeForce 8800 GTS graphics, with 640-MB of video memory. For the motherboard -- the key component of any system -- we selected an Asus P5E64 WS Professional. This mobo uses the new Intel X38 chipset, and was one of the first to support the 1600-MHz front-side bus used in the QX9770. (Most Intel Socket 975 boards only handle FSB speeds up to 1066- or 1333-MHz. The P5E64 WS exhibit's Asus's usual attention to detail, incorporating an ample complement of on-board copper cooling pipes to draw heat away from the processor and core-logic chipset.
However, the mobo did hammer home one often-neglected item which should be on every PC builder's to-do list. Namely, always check whether a BIOS update is available for your motherboard. In the case of the Asus, attention to this detail would have same us a lot of time spend investigating what at first glance appeared to be a memory compatibility issue.
A key element of the project turned out not be to electrical, but rather physical. This was the task of picking out a case. No part of the project is less enticing. However, the PC's enclosure used to be an afterthought. Nowadays, with hot-running modern processors, it's critical.
Complicating the problem is that the choice of cases used to be limited to a $39 special or some fancy day-glo model aimed at gamers. Now, there are too many options. The first crop I call "snap-in" designs. These are the cases with all those do-dads so you supposedly don't have to screw in the drives and cards; these never work properly, by the way. The second, more important category of cases is designed to support good cooling.
Beefed-Up Supply
The Core 2 Extreme QX9770 demands one of the latter. This 3.2-GHz quad-core powerhouse is rated at 136W. Technically, the 136W figure is what Intel calls the TDP, for thermal design power or thermal design point. This isn't its dissipation all the time, or in the real world even most of the time. But it does mean that you have to build your system so that it can properly cool a processor that's chugging away at 136W.
The figure of 136W for the QX9770 is 6W higher than the 130W TDP of the QX6850 processor I used in my last PC build project. There, I focused mostly on selecting a strong fan-plus-heatsink for the processor, and didn't worry too much about the case. I picked the Arctic Cooling Freezer Pro 7, a solution I highly recommend, in no small measure because its clips can actually be attached to the motherboard. (If you've messed around with a lot of heatsinks, you know why this is important, and how many shockingly bad designs are out there.)
After I built that box, I was worried that my inattentiveness to cooling would result in a fried PC. However, the QX6850 has run surprisingly cool. Still, for the QX9770, I wanted to aim for an overdesigned cooling environment. This means a killer case. On the other hand, I didn't want to pay hundreds of bucks for those great enclosures, by Thermaltake and others, that I read about every month in Maximum PC.
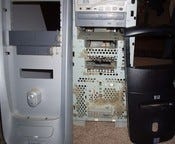
The perfect solution presented itself from the junk pile. It's the case from an HP Pavilion 9995, which was billed when it came out in 2001, as the first retail PC with a built-in DVD+RW drive. It had a 2.0-GHz Pentium 4 processor, and sold for $2,000. So the Pavilion was a pretty high-end PC for its time.
|
|
| |
|
More important, the Pavilion case was way overbuilt for its time. It's got lots of room, which I will undoubtedly eat up when I put in my 975 motherboard, 700-W power supply Thermal Pro cooler, and high-end graphics card.
With the case cleaned out and prepped, I plunged headlong into the build. However, I ran into a few unexpected roadblocks. The first came after I popped the QX9770 into a nice Intel motherboard I had lying around, only to find out that the board, being based on a 975 core-logic chipset, didn't support the Core 2 Extreme's 1600-MHz front-side bus. Because the QX9770 began shipping in March, there weren't many motherboards supporting its ultrafast FSB, when I began my project in January.
Asus saved the day by providing a review motherboard in the form of its new P5E64 WS Professional. This mobo uses the new Intel X38 chipset, and is one of not too many out there right now which can go full speed on the QX9770's 1600-MHz front-side bus. It's got the usual Asus attention to cooling detail, as you'll see in the video, which shows the board's ample complement of copper cooling pipes.
After installing the processor, I attached its heat sink and fan. For this component, I used a Sunbeam CR-SW-775 Silent Whisper. (Usually I use an Artic Cooling Freezer Pro 7, but the Sunbeam was on sale for $19 at Newegg.)
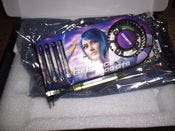
Next, I installed the Gigabyte GeForce 8800 GTS graphics card and a 500-GB Maxtor SATA hard drive. To support the graphics card, I upgraded the typical 450-W unit to a 750-W supply.
For memory, I used 2-GB (2 x 1-GB) of DDR3 SDRAM from Crucial Memory.
Diagnostics Sequence
Now, the PC was ready to fire up. However, for the first time in many projects, I hit a snag. Working through the problem left me convinced that gremlins lurk in every system. Fortunately, I was saved by a novel diagnostic indicator, which Asus included with the motherboard.
The average project offers so little leeway -- it's more equivalent to a kit, where you're bolting together preassemblies -- that I suspect most people do these things on auto-pilot. I know I do. Which is why I've always wondered what the heck I'd do if I ran into a real problem. It's not like most PC builders have logic analyzers lying around.
Heck, even if I had detailed specs -- and I suspect many components headed to market on 18-month (or less) product life-cycles are cobbled together with precious little documentation -- what would I do if I found a problem? Remove and resolder a multi-hundred-solder-bump IC onto a multilayer printed-circuit board? I don't think so.
My first little stumbling block was that I neglected to read the specs on the Asus P5E64 motherboard. I tried to install some leftover DDR2 memory, but the sticks wouldn't fit, because the middle tab is in a different place on DDR2 and DDR3 SIMMs.
Purchasing the 2 GB of Crucial Memory DDR3 solved the SDRAM installation problem, and I completed the build. However, when I buttoned up the case, after an initial flash of power, the PC wouldn't boot. This was all the more confounding, because the first time I turned on the power supply, the mobo LED lit up.
This was a clear indication that power was present, and that there weren't any shorts. (A short between the mobo and the case, where some of the solder on the underside of the board is touching the aluminum of the enclosure, is usually the first culprit when a newly build PC doesn't fire up. That and forgetting to positively plug in all the on-board power connectors.)
|
|
| |
|
I wish I could say that I attempted a systematic diagnosis of my potential troubles, but that's not how these things work. After checking the mobo for shorts (i.e., loosening its nine screws and trying the power again), and verifying that all the power connectors were attached, I set about looking for jumpers. Clearing the real-time clock, which entailed moving the RTC jumper from pins one and two over to pins two and three, waiting 10 seconds and reseating the jumper in the original position, did the trick.
I was finally able to fire up the PC. Because I was using a 500-GB Maxtor hard drive onto which I had previously installed Ubuntu Linux -- that install was for a project done on another system -- I was able to completely boot up the PC. Success! Unfortunately, I couldn't remember my Ubuntu user password, so I wasn't able to begin doing "real work."
No matter -- my intention wasn't to use Ubuntu, it was to install Windows Vista. However, before I got to loading the Microsoft operating system though, I was plagued with the problem of the computer locking up after shutting down. That is, I could turn it off, but many times it wouldn't reboot. I soon realized that the machine needed frequent resets of the RTC clock -- that pesky jumper again.
Testing The System
Here's where I turned to the nifty Asus diagnostic device (picture below) included with the P5E64 motherboard. Called the G.P. Diagnosis Card, this 1-in wide by 2-in high card attaches to a connector on the edge of the motherboard. It's got two LEDs, which display a status code. (The codes are outlined in Asus's manual for the mobo.)
Turns out my system wasn't making it past the memory test, during its power-on system test (POST) sequence. This indicated that there was a problem involving the DDR3 SDRAM. Of course, I was afraid I'd fried the memory. If this had been an older machine, I'd have swapped out the RAM for a spare. However, since it used the expensive, new DDR3, and I only had the two 1-GB sticks, all I could do was remove one bank and then the other. I also tried reconfiguring the locations, since the mobo had two A-channel and two B-channel DRAM slots.
None of this had any effect. This PC would boot after RTC reset, and then get stuck at the POST memory test on a subsequent restart. At one point, I thought the problem might have been metal on the underside of the GeForce 8800 GTS graphics card, which was resting right atop the CMOS battery. (It's that battery which maintains the RTC.) I applied a little electrical tape (sure to be a gooey discovery several years hence) between the two, which is good practice anyway. But it did nothing to solve the problem.
Realizing finally that I had to do some investigation, I hit the online forums, including Asus's own. It quickly became apparent that many of the newer systems -- specifically, cutting-edge motherboards running ultra-fast DDR3 memory -- have issues with getting full compatibility in place. Namely, much of this stuff is so new, it takes time before, say, motherboard X, is compatible with memory from each and every vendor. Perhaps that's why the Asus manual contained a list of DDR3 SDRAM specifically approved for use with the mobo. I had wondered about that, because I rarely recall seeing such lists before. It did concern me that my Crucial Memory modules were not on that list -- though they are listed as being compatible on Crucial's Web site -- but not too much, because, again, who really pays attention to the stuff?
Are you guessing where I'm headed here? I found an updated BIOS on Asus's support Web site, which did the trick. The new BIOS said that the update was to address "memory compatibility issues." Bingo.
|
|
| |
|
Since I've loaded the BIOS onto the motherboard, the system has been rock solid. I still crane my neck to look at the G.P. Diagnosis Card as the system goes through POST, to make sure it gets past the memory test, but I'm sure I'll get over that shortly.
Installing Vista
Windows Vista installed easily, with no surprises. The OS, while still pleasing to the eye, doesn't require a learning curve anymore; it's a year and a half old now. Since I had the speedy QX9770 at my disposal, and because I wanted to run a video-editing app which wasn't Vista-compatible, I decide to do a dual-boot setup, installing Windows XP on another partition of the hard drive.
I'm a big Vista fan, but I found it shocking to be reminded just how much faster Windows XP really is than Vista.
The dual-boot installation process is no cakewalk. As with all mods, that's largely because of all the minor, unexpected things which rise up. For example, I had to continually mess around with the boot order in the BIOS, so that my system would proceed from where it left off with on the Windows XP installation disc, rather than unsuccessfully attempted to boot off of the temporarily messed up (because the install was in-process) hard drive.
There are a lot of cookbook explanations floating around on the Web, which will walk you through the installation. The best one I found, for loading XP onto a system with Vista already in place, is on the SysChat forum. Its directions get you around a key stumbling block; namely, that Vista's automated boot-fix tool isn't the way to go. (You'll encounter this issue, because when you install XP onto a machine which already has Vista, it "breaks" Vista's boot-loader. A key step in the dual-boot process is fixing this.)
As the Syschat instructions correctly point out (on page 3), you need to go into the command prompt and type in these two lines:
Bootrec.exe /fixMBR
Bootrec.exe /fixBoot
Now that both Vista and XP are installed on the QX9770 PC, I have to admit I find myself opting to boot up in XP more often than not. True, that's partly because I have my video-editing app installed on the XP side. However, XP is so much faster -- for every single task I attempt -- it's not even funny.
I wish I could tell you I had quantitative data confirming my statement that XP is faster than Vista. Unfortunately, I only have my anecdotal, subjective impressions. I did run numerous benchmarks. However, the Futuremark PC Vantage benchmark I ran on the Vista side doesn't run under XP. I figured PCMark05 would form a more apt basis for comparison. However, while the benchmark ran successfully on my XP install, it wouldn't get past the hard-drive initialization test under Vista. Searching Futuremark's forums, I found this is a not-uncommon occurrence.
As well, the system underperformed comparable machines with scores posted on Futuremark's ORB comparison site. That's because, while my system has a strong processor and graphics card, it's dragged down by the hard drive and, to some extent, by the memory, which isn't the fastest possible DDR3 available
Aftermath
In conclusion, the QX9770 PC is impressive on all performance fronts, with the exception of the aforementioned benchmarks. Intel clearly has a winning desktop processor on its hands, with strong appeal to performance enthusiasts and to any users who want to run compute-intensive apps, such as video ended. The Asus P5E64 WS Professional is also a winner, and a great companion to Intel's top-of-the-line Core 2 Extreme.
Resources
QX9770 Processor, at TigerDirect for $1,600.
Asus P5E64 WS Professional motherboard.
Sunbeam CR-SW-775 Silent Whisper heat sink.
Gigabyte GeForce 8800 GTS graphics card.
About the Author(s)
You May Also Like
More Insights
Webinars
Editor's Choice


May 2, 2024
While there are plentiful options in cyber resiliency and business continuity tools and platforms, there isn’t one that can knock out everything from sudden cloud outages to prolonged ransomware attacks in a single punch. What can you do to keep the company on its feet no matter what is thrown at it? Find out in this new virtual event.
Reserve Your Seat Now